How to Upload Folders to Google Cloud Jupyter Notebook

by Bharath Raj
How to Upload large files to Google Colab and remote Jupyter notebooks

If you haven't heard about it, Google Colab is a platform that is widely used for testing out ML prototypes on its gratis K80 GPU. If yous take heard about it, chances are that you gave it shot. But you might have become exasperated because of the complexity involved in transferring large datasets.
This blog compiles some of the methods that I've found useful for uploading and downloading large files from your local system to Google Colab. I've also included additional methods that can useful for transferring smaller files with less effort. Some of the methods can exist extended to other remote Jupyter notebook services, like Paperspace Gradient.
Transferring Large Files
The most efficient method to transfer large files is to apply a deject storage organization such every bit Dropbox or Google Drive.
1. Dropbox
Dropbox offers upto 2GB gratuitous storage infinite per account. This sets an upper limit on the amount of information that y'all can transfer at any moment. Transferring via Dropbox is relatively easier. Y'all can also follow the aforementioned steps for other notebook services, such equally Paperspace Gradient.
Step 1: Archive and Upload
Uploading a large number of images (or files) individually will take a very long time, since Dropbox (or Google Drive) has to individually assign IDs and attributes to every epitome. Therefore, I recommend that you archive your dataset outset.
One possible method of archiving is to convert the folder containing your dataset into a '.tar' file. The code snippet below shows how to convert a binder named "Dataset" in the dwelling directory to a "dataset.tar" file, from your Linux last.
tar -cvf dataset.tar ~/Dataset Alternatively, you could use WinRar or 7zip, whatever is more convenient for you. Upload the archived dataset to Dropbox.
Stride 2: Clone the Repository
Open up Google Colab and start a new notebook.
Clone this GitHub repository. I've modified the original code and so that information technology can add the Dropbox access token from the notebook. Execute the following commands one by one.
!git clone https://github.com/thatbrguy/Dropbox-Uploader.git cd Dropbox-Uploader !chmod +x dropbox_uploader.sh Step 3: Create an Access Token
Execute the following control to run across the initial setup instructions.
!fustigate dropbox_uploader.sh It will display instructions on how to obtain the access token, and will ask y'all to execute the following command. Replace the bold messages with your admission token, then execute:
!echo "INPUT_YOUR_ACCESS_TOKEN_HERE" > token.txt Execute !bash dropbox_uploader.sh again to link your Dropbox account to Google Colab. Now you lot can download and upload files from the notebook.
Step 4: Transfer Contents
Download to Colab from Dropbox:
Execute the following command. The argument is the proper name of the file on Dropbox.
!bash dropbox_uploader.sh download YOUR_FILE.tar Upload to Dropbox from Colab:
Execute the following command. The first argument (result_on_colab.txt) is the name of the file y'all want to upload. The 2d argument (dropbox.txt) is the name you want to save the file as on Dropbox.
!bash dropbox_uploader.sh upload result_on_colab.txt dropbox.txt 2. Google Drive
Google Drive offers upto 15GB free storage for every Google account. This sets an upper limit on the amount of data that you tin can transfer at any moment. You lot tin always expand this limit to larger amounts. Colab simplifies the authentication process for Google Drive.
That being said, I've as well included the necessary modifications yous can perform, so that yous tin access Google Drive from other Python notebook services as well.
Pace i: Archive and Upload
Just as with Dropbox, uploading a large number of images (or files) individually will take a very long fourth dimension, since Google Bulldoze has to individually assign IDs and attributes to every paradigm. So I recommend that you archive your dataset first.
One possible method of archiving is to convert the folder containing your dataset into a '.tar' file. The lawmaking snippet beneath shows how to convert a binder named "Dataset" in the home directory to a "dataset.tar" file, from your Linux terminal.
tar -cvf dataset.tar ~/Dataset And once again, y'all can use WinRar or 7zip if you prefer. Upload the archived dataset to Google Drive.
Step 2: Install dependencies
Open Google Colab and start a new notebook. Install PyDrive using the following command:
!pip install PyDrive Import the necessary libraries and methods (The bold imports are just required for Google Colab. Practise not import them if y'all're not using Colab).
import os from pydrive.auth import GoogleAuth from pydrive.drive import GoogleDrive from google.colab import auth from oauth2client.customer import GoogleCredentials Step 3: Qualify Google SDK
For Google Colab:
Now, y'all have to authorize Google SDK to admission Google Bulldoze from Colab. Commencement, execute the following commands:
auth.authenticate_user() gauth = GoogleAuth() gauth.credentials = GoogleCredentials.get_application_default() drive = GoogleDrive(gauth) You will get a prompt equally shown below. Follow the link to obtain the key. Copy and paste it in the input box and press enter.

For other Jupyter notebook services (Ex: Paperspace Slope):
Some of the following steps are obtained from PyDrive's quickstart guide.
Get to APIs Console and make your own project. So, search for 'Google Drive API', select the entry, and click 'Enable'. Select 'Credentials' from the left card, click 'Create Credentials', select 'OAuth client ID'. Y'all should come across a menu such as the prototype shown below:
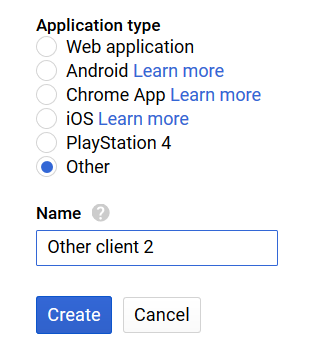
Set up "Application Type" to "Other". Give an appropriate proper noun and click "Relieve".
Download the OAuth 2.0 client ID you merely created. Rename it to client_secrets.json
Upload this JSON file to your notebook. Yous tin can practise this by clicking the "Upload" push button from the homepage of the notebook (Shown Below). (Notation: Practice not use this push to upload your dataset, as it will be extremely fourth dimension consuming.)

At present, execute the post-obit commands:
gauth = GoogleAuth() gauth.CommandLineAuth() drive = GoogleDrive(gauth) The rest of the procedure is similar to that of Google Colab.
Pace four: Obtain your File's ID
Enable link sharing for the file you desire to transfer. Re-create the link. You lot may get a link such equally this:
https://bulldoze.google.com/open up?id=YOUR_FILE_ID Copy only the bold function of the above link.
Step 5: Transfer contents
Download to Colab from Google Drive:
Execute the following commands. Hither, YOUR_FILE_ID is obtained in the previous footstep, and DOWNLOAD.tar is the proper name (or path) y'all want to relieve the file every bit.
download = drive.CreateFile({'id': 'YOUR_FILE_ID'}) download.GetContentFile('DOWNLOAD.tar') Upload to Google Bulldoze from Colab:
Execute the following commands. Hither, FILE_ON_COLAB.txt is the proper noun (or path) of the file on Colab, and DRIVE.txt is the proper name (or path) you desire to save the file every bit (On Google Drive).
upload = drive.CreateFile({'title': 'Drive.txt'}) upload.SetContentFile('FILE_ON_COLAB.txt') upload.Upload() Transferring Smaller Files
Occasionally, you may want to pass just one csv file and don't want to go through this unabridged hassle. No worries — in that location are much simpler methods for that.
1. Google Colab files module
Google Colab has its inbuilt files module, with which yous tin upload or download files. Y'all can import it by executing the following:
from google.colab import files To Upload:
Utilise the following command to upload files to Google Colab:
files.upload() You will exist presented with a GUI with which yous can select the files you desire to upload. It is not recommended to apply this method for files of large sizes. It is very slow.
To Download:
Use the post-obit command to download a file from Google Colab:
files.download('case.txt') This feature works best in Google Chrome. In my experience, it simply worked once on Firefox, out of about ten tries.
2. GitHub
This is a "hack-ish" way to transfer files. You can create a GitHub repository with the minor files that you lot want to transfer.
Once you create the repository, you lot can just clone it in Google Colab. You can then push your changes to the remote repository and pull the updates onto your local system.
But practice note that GitHub has a hard limit of 25MB per file, and a soft limit of 1GB per repository.
Thank you for reading this article! Exit some claps if you it interesting! If yous accept whatever questions, you could hit me upward on social media or send me an email (bharathrajn98[at]gmail[dot]com).
Larn to code for costless. freeCodeCamp's open source curriculum has helped more than 40,000 people get jobs as developers. Become started
Source: https://www.freecodecamp.org/news/how-to-transfer-large-files-to-google-colab-and-remote-jupyter-notebooks-26ca252892fa/
0 Response to "How to Upload Folders to Google Cloud Jupyter Notebook"
Enviar um comentário